For Access: simply choose the Locate
Access File button and then choose the Access
Database. Note:
The access database needs to be located in the same path as the
generated files for the ASaP files to work. You can
then click Next to begin choosing fields.

For MySQL: Follow the instructions below.
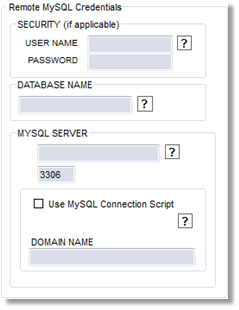 Under “Security”, enter
the user name and password needed to connect to your database on
the server.
Under “Security”, enter
the user name and password needed to connect to your database on
the server.
Also enter the database name, as well as the domain name or IP address for the server that hosts the Mysql database. If you need to use a port other than 3306, enter it below the domain name / IP address.
Finally, if you are using the MySQL connection script, check the box and enter the domain name of the server that is hosting your website and contains the MySQL connection script. (This should have already been published to the server on the previous screen, “Publish Information”.)
Be sure to click “TEST CONNECTION” to verify that the information you have entered is correct and that a connection is successfully made to the database!
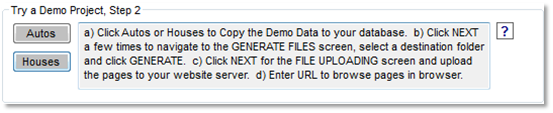
DEMO PROJECTS: If you loaded one of the demo projects on the “Manage Screen” screen, click either “Autos” or “Houses” at the top of the screen to have the demo tables added to your database.